This post contains affiliate links.  Click here to see what that means.

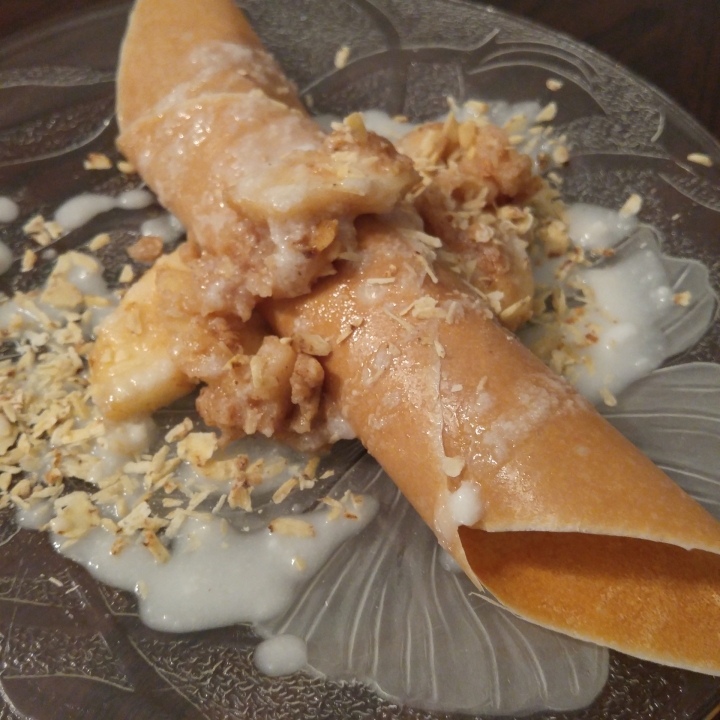
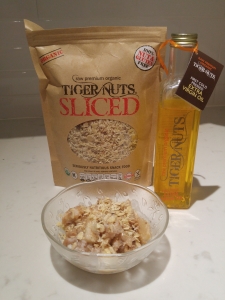
I don’t very often make dessert, but when I do, it needs to be simple – simple ingredients and few steps, and fast -because I don’t like spending a lot of extra time in the kitchen just to treat myself! I also love familiar flavors, so this TigerNuts Apple Crumble Crepe recipe is definitely a winner!

AIP Tigernuts Apple Crumble CrepesWhile I’m not a recipe creating expert, I’m pleased to have accepted the invitation from TigerNuts USA, to dabble with some of their ingredients – Sliced TigerNuts and Premium Organic TigerNuts Oil. (Thank you for sending me these goodies TigerNuts USA!)

While I’ll admit that my first recipe idea to use these ingredients was a fail (I knew it was a long-shot but I had to try), I’m inspired to present you with something new and delicious.

If you’re just getting started on the AIP and you haven’t heard of TigerNuts, I’m sure you’ll be running across recipes soon that call for one iteration of them or another.

Before we go any further, you should know that they’re not nuts at all, they’re actually tubers, so they’re 100% AIP elimination stage compliant! Woohoo! (You can learn more about them in my post about unfamiliar foods you’ll run into on your AIP journey – click here and on my affiliate’s website – TigerNuts USA)

Special Offer

Save 5% Off Every Order at TigerNuts USA with Coupon Code: AIP5
CLICK HERE TO 
SHOP

TigerNuts flour was one of the first ingredients I decided to try when I started my personal AIP journey, and I have to say they’re probably one of my favorite AIP dietary discoveries. You’ll find lots of recipes posted in my AIP Recipe Collection Facebook Group that calls for them, and I think the flour makes some of the most realistic, crunchy AIP cookies I’ve ever tried. 

If you’re sensitive to coconut, you’ll want to pay careful attention, as you’ll find TigerNuts can often come to the rescue – TigerNuts butter, oil, milk, flour, flakes and more – so be sure to check them out! You can find lots of TigerNuts products in our affiliate shop, Fully Healthy (formerly Shop AIP) where you can save 10% on your first order with our exclusive coupon code – AIPRecipe (click here), or you can shop directly at TigerNuts USA (click here).

Shop AIP - shopping for your autoimmune lifestyle - Fully Healthy Discount - AIP Recipe Collection

The Recipes

While I’m hoping to bring you some more inventive TigerNuts recipes in the days ahead, this simple combination came together in the kitchen and I just had to share it right away! 

Don’t have any wraps to make crepes? No worries – this recipe is totally delicious served simply as a crumble.

Enjoy!


AIP Tigernuts Apple Crumble Crepes

TigerNuts Apple Crumble Crepes

Yield: 4 Servings
Prep Time: 5 minutes
Cook Time: 10 minutes
Total Time: 15 minutes

♥ RECIPE & IMAGE BY: AIPRecipeCollection.com ♥ This fast and easy skillet dessert is every bit as delicious as its oven-baked counterparts ... and no one will know it's AIP!

Instructions

  1. Peel, core and slice apples.
  2. Heat tigernut oil in a large frying pan over medium heat.
  3. Add the apples to the pan, sprinkle with cinnamon, ginger and salt and sautee apples stirring occasionally. Cook until they reach desired tenderness, approximately 10 minutes should do it.
  4. Stir in coconut butter, maple syrup or honey and tigernut flakes. There's no exact science to this. Give the mixture a taste and add additional seasoning, coconut butter or tigernut flakes if you wish.
  5. Spoon a little less than 1/4 of the mixture onto your wrap. Roll and place on your desired serving plate. Top with a few more apples, drizzle with coconut butter and a healthy pinch of tigernut flakes.
  6. Enjoy immediately!

Notes

Don't have coconut wraps and don't want to go to the bother of trying to make your own AIP option? This dessert is delicious even without the wrap - simply serve in a bowl as you would any apple crumble. Drizzle with coconut butter and tigernut flakes and enjoy immediately. Refrigerate any left overs - they're just as tasty cold.

TIP:

You can make this recipe coconut free if you need it to be ... just use tigernut butter in place of the coconut butter - easy peasy!

This post contains affiliate links.  Click here to see what that means.

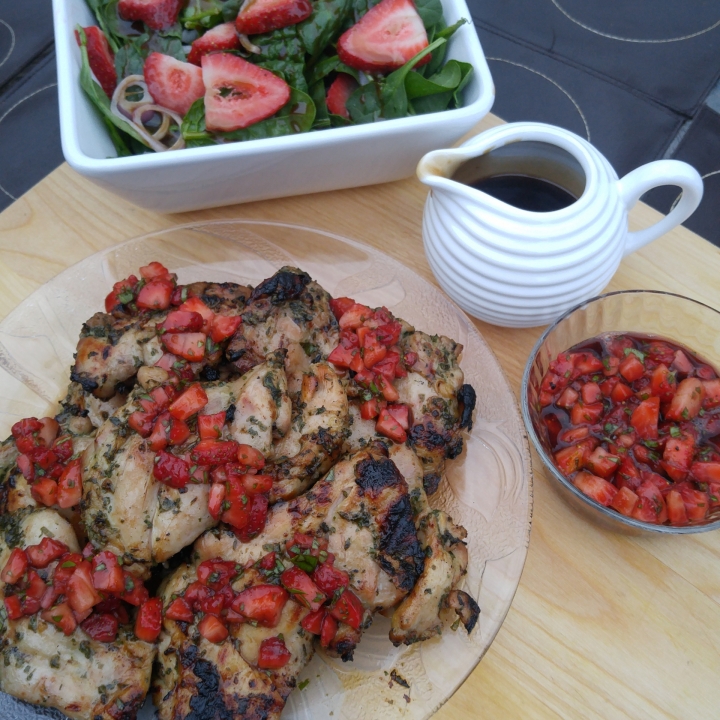
Looking for a budget-friendly meal that will impress even the toughest of critics? These simple, flavorful Herb-Marinated Chicken Thighs with Strawberry Balsamic Salsa paired with Spinach Strawberry Salad with Honey Balsamic Dressing will satisfy the senses and delight the taste buds!

Welcome to the next installment of our truLOCAL sponsored AIP Recipe Collection Grill Series!

If you missed the earlier recipes in our series, be sure to check them out – AIP Recipe Collection Grill Series.

Our goal with this series is to bring you some drool worthy AIP grill recipes that EVERYONE will enjoy, but won’t take you forever and a day in the kitchen! That’s right folks – no need to cook separate meals when you’re serving up this kind of deliciousness! 

Since we know that grilling can be a bit of an art, we’ve tried to make the step-by-step instructions as precise as possible, and have included a few useful tips to help even the beginner feel like king of the grill!  But don’t worry – the recipes are easy!

But first, a word about our sponsor!

About truLOCAL

truLOCAL is a fully flexible meat delivery/subscription service that connects you with top-quality, LOCALLY sourced meat and fish!

It’s a simple meat delivery service with customizable plans that are commitment-free, so you can skip, pause, or cancel at any time – no strings attached! Shop for clean, locally sourced meat products online and make fewer trips to the grocery store or specialty shops.
 
truLOCAL is available in Canada, and yes, it’s TRULY LOCALLY Sourced Meat! That means you’re supporting YOUR local farmers! 
  • EAT BETTER
  • SAVE TIME
  • SHOP LOCAL
  • ALWAYS FLEXIBLE ALWAYS FREE DELIVERY! 

But wait, there’s more!

Special OffertruLOCAL Coupon Code AIPRecipeCollection.com

I’m thrilled that our partners at truLOCAL have agreed to offer my followers their CHOICE of amazing offers!
Get 10% OFF -or- FREE Boneless Skinless Chicken Breasts in their first TWO orders!

Shop with our affiliate link here and use coupon code AIPRECIPES10 for 10% off – or – coupon code AIPRECIPES at checkout and you’ll receive 6 or 4 FREE Boneless, Skinless Chicken Breasts in your first TWO boxes! (In Regular Size Box Orders – 6 / In Small Size Box Orders – 4. Please be sure to shop with BOTH the affiliate link AND the Coupon Code in order for your FREE Chicken Breast offer to be credited correctly.)

The Recipe

This simple recipe is bursting with the fresh flavors of summer and uses common ingredients you probably already have on hand, and active prep and cook time is kept to a minimum – just what we all need!

We hope you enjoy this installment of our truLOCAL-inspired grilling series of recipes.  Bon Appetite! ♥

Shop AIP - shopping for your autoimmune lifestyle - Fully Healthy Discount - AIP Recipe Collection

Herb-Marinated Chicken Thighs with Strawberry Balsamic Salsa

Herb-Marinated Chicken Thighs with Strawberry Balsamic Salsa

Yield: 4 Servings
Prep Time: 15 minutes
Cook Time: 20 minutes
Additional Time: 1 hour
Total Time: 1 hour 35 minutes

♥ RECIPE & IMAGES BY: AIPRecipeCollection.com ♥ The whole family will enjoy these simple, budget-friendly chicken thighs. They're dressed to impress and will certainly dazzle your taste buds.

Ingredients

Marinade

Salsa

Instructions

  1. Thaw your truLOCAL chicken thighs in the refrigerator overnight or defrost in their packaging in cold water.
  2. Mix all marinade ingredients together in a shallow glass dish. Massage marinade into the chicken and arrange in a single layer and allow to marinade for 1 to 12 hours in the refrigerator.
  3. Bring chicken to room temperature approximately 15 minutes before grilling, this will help ensure your meat cooks more evenly.
  4. While the chicken returns to room temperature, prepare the salsa. NOTE: prepare the salsa no further in advance than this for best results and flavor.
  5. Mix all  mixing all salsa ingredients together in a small bowl and allow to stand covered at room temperature.
  6. Preheat an outdoor grill to medium-high heat.
  7. Remove chicken thighs from marinade and place on pre-heated grill. Season with salt and pepper. 
  8. Allow chicken thighs to cook over medium-high heat until they release easily from grill, about 5 minutes. Turn chicken thighs over, season again with salt and pepper and allow to cook on second side until chicken releases easily from grill.  Reduce flame or move chicken to cooler spots on your grill to avoid burning or flareups. Continuing grilling chicken, turning and moving until cooked through and juices run clear.
  9. Remove chicken from grill and allow to rest, tented with foil, for a few minutes prior to serving. This allows the juices to settle back into the chicken.
  10. Serve with a couple of spoonfuls of Strawberry Balsamic Salsa on top.

This post contains affiliate links.  Click here to see what that means.

Looking for an easy accompaniment to go with your Herb-Marinated Chicken Thighs with Strawberry Balsamic Salsa? Or craving something different for a simply flavorful AIP breakfast or lunch? It doesn’t get much easier than this Spinach Strawberry Salad with Honey Balsamic Dressing!

As a stand-alone salad, this one’s fresh, light and so simple, and lends itself well to being topped with left over chicken, salmon or even canned tuna or sardines for a nutrient packed meal.

Shop AIP - shopping for your autoimmune lifestyle - Fully Healthy Discount - AIP Recipe Collection

The Inspiration 

This recipe is part of  our AIP Recipe Collection summer grilling project where we’re bringing you some tasty truLOCAL-inspired recipes.

Be sure to check out the main dish we suggestion pair this recipe with – Herb-Marinated Chicken Thighs with Strawberry Balsamic Salsa

Enjoy! ♥

AIP Spinach Strawberry Salad with Honey Balsamic Dressing

Spinach Strawberry Salad with Honey Balsamic Dressing

Yield: 4 Servings
Prep Time: 10 minutes
Total Time: 10 minutes

♥ RECIPE & IMAGES BY: AIPRecipeCollection.com ♥ An easy accompaniment for any grilled meal and a perfectly simple stand alone salad easily adapted for breakfast or lunch.

Ingredients

  • 6 Cups Baby Spinach, washed and spun dry
  • 1 Cup Strawberries, washed, dried and then sliced
  • ½ Cup Red Onion, thinly sliced

Honey Balsamic Dressing

Instructions

  1. PREPARE THE DRESSING: Measure all dressing ingredients into an upright container and blend well with an immersion blender to emulsify. Season with salt and pepper to taste. TIP: If you find the dressing a little too sweet, try adding a squeeze or two of lemon.
  2. PREPARE THE FRUIT & VEG:  Combine spinach, strawberries and red onion in a serving bowl.
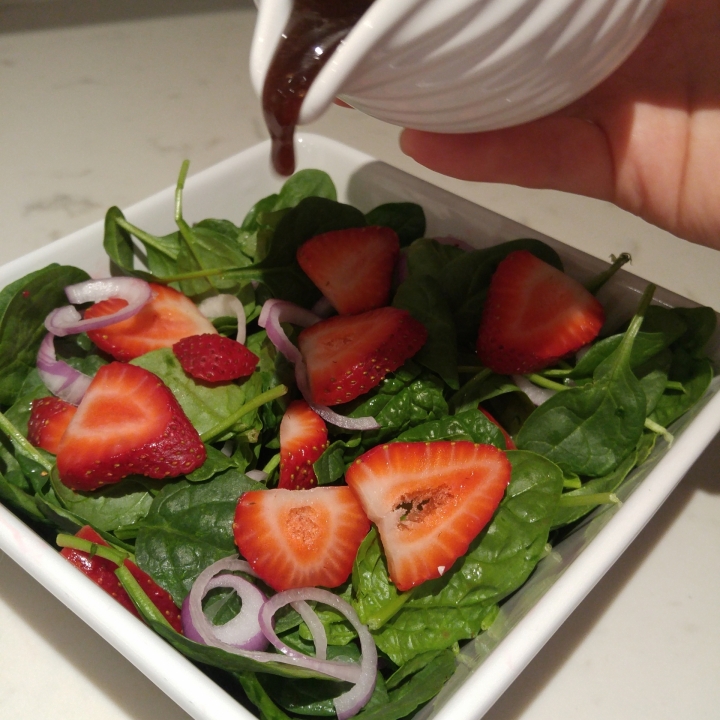
  3. Just prior to serving, pour dressing over top and gently toss to coat.
  4. Serve immediately.

This post contains affiliate links.  Click here to see what that means.

AIP baking is a tricky thing, and even more of an exact science than regular baking, so you’ll have heard me say many times in the the AIP Recipe Collection Facebook Group that I do NOT recommend substitutions in AIP baking! You can read more on the topic in my article Substitutions in AIP Cooking & Baking so you understand why this is so important.

That said, many AIP recipes call for gelatin or agar agar powder or gelatin eggs, or if you’ve found a paleo recipe it may call for a flax or chia egg!  All of this can be quite confusing, especially since some of them require that you make a gelatin egg separately and others just have you adding gelatin to the mix.

So, what’s the breaking news on AIP egg replacements (see what I did there)? And, can’t I just use the egg replacements available at the grocery store? Here are the answers you’ve been looking for!

The Purpose of Eggs in Baking

Eggs are used for several reasons in baking; binding (holding things together like meatloaf and meatballs – this is the job of the whites), leavening (rising and creating a light fluffy texture – this is the job of the yolk), for moisture and also for flavor and appearance (often aids in browning).

Can we cook and bake with out them? Absolutely! 

Will the replacements yield perfect results? No – unfortunately there is nothing that will ever perfectly replace an egg! BUT we can get pretty darn deliciously close! 

Things to consider:

Binding – You’ll find that most meatloaf and meatball recipes work perfectly well without eggs, or maybe you just need to add a little mashed veg in as an alternate binder. 

Leavening – You’ll find many AIP baking recipes call for cream of tartar – this is a leavening agent and should never be omitted from a recipe just because you don’t have it – the results will literally be a flop.

Moisture & Appearance – Most AIP recipes make up for eggs in other ways, and recipe creators go to great lengths to ensure the the dishes they’re presenting look and taste as close to traditional recipes as possible – so don’t mess with a good thing – follow the AIP recipes folks!  If you haven’t checked out the post I suggested, here it is again – Substitutions in AIP Cooking & Baking.

In general, it’s not a good idea to try to recreate a traditional recipe into an AIP compliant version if you’re replacing more than 1 or 2 eggs. Why? Because more than this and you’re at risk of your recipe caving in, coming out too dry, too wet, crumbly, too dense, or just not what you expected.

Commercial Egg Replacements

Let’s start here since this would be considered the path of least resistance and most enticing for some.

The reason why we don’t use these is the ingredients -most contain grain potato starch, corn starch, guar gum and the like. So, sorry folks, this option just doesn’t work.

Apple Sauce, Mashed Bananas, Pumpkin & Avocado

Next we’ll move on to old, traditional favorite substitutions that our mothers and grandmothers would have used. In general I don’t see a lot of AIP baked opting for these substitutes now-a-days – most AIP recipe creators have moved on to something a little more shall we say, egg-like! However, before we go there …

Mashed fruits like bananas and avocado, apple sauce and pumpkin/squash puree can often be a good substitute for an egg in recipe. It’s really very subjective though and you must decide on a recipe by recipe basis what is most suitable.  Overall however, these options work best in cakes, muffins and brownies.

Whichever of these options you choose to use, you can replace each egg with 1/4 cup (65 grams) of purée.

Baked goods made with puréed fruits may not brown as deeply, but they will be very dense and moist.

Be aware that banana will obviously give you more of a banana flavor, so if you want something neutral – try some of the others instead

Agar-Agar & Gelatin

Before we dive in, I will tell you that while neither of these replacements should affect the flavor of your finished product, they may create a slightly stiffer texture. Unfortunately, nothing can replicate the egg exactly.

Gelatin

Gelatin eggs are probably the most commonly suggested egg substitute that you’ll see in recipes. If you’ve made one before, you’ll know why – it’s very close to the texture and viscosity of egg whites. Neither of these replacements should affect the flavor of your finished product, but they may create a slightly stiffer texture.

When it comes to gelatin, quality matters (sorry guys – Knox Gelatine is out as it’s highly processed and not from well cared for animals) – be sure to use gelatin made from grass-fed / pasture-raised animals (pigs – called porcine gelatin and/or cows – called beef gelatin – you can find quality gelatin brands here, from our partners at Perfect Supplements (See coupons page for current offers) or in our Amazon storefronts – go here and follow the link for either USA, Canada or the UK). 

METHOD #1:

While there are several ways to make a gelatin egg, this is my favorite and it’s never failed me yet!

1 Tbsp Gelatin
1/4 Cup Water
Add water to a small pot and sprinkle the gelatin over top.
Allow to sit for 2-3 minutes until the mixture hardens somewhat.
Place the post on a burner set to low heat for 1-2 minutes until the gelatin starts to melt. Be careful not to burn it! I usually stand by and start immediately whisking it.
Remove the pot from the heat and vigorously whisk until the mixture becomes frothy.

METHOD #2:

To replace one egg, dissolve 1 tablespoon (about 9 grams) of unflavored gelatin in 1 tablespoon (15 grams) of cold water. Then, mix in 2 tablespoons (30 grams) of boiling water until frothy.

AN IMPORTANT NOTE on gelatin: Just because you see a recipe calls for gelatin, it does not mean you will necessarily mean that you will go through the process of making a gelatin egg separately before adding it to the recipe. Follow the instructions as set out in the recipe you’re using for best results. IF the recipe indicates you are using gelatin and water to make a gelatin egg, follow those directions carefully as there are different ways to make a gelatin egg and the specific method recommended may yield better results in that particular recipe.

Agar Agar

If you’re avoiding animal products (though on the AIP you really shouldn’t be – read my article about that – Can the AIP Be Done As a Vegetarian?), you can opt for agar-agar powder or flakes. Agar agar is a vegan alternative to gelatin and is made from a type of seaweed or algae – you can find it here.

I’ve seen different suggestions for how to make an agar agar egg, so you’re going to be best to follow the instructions carefully in any recipe that you find if it calls for agar agar. Again, similar to gelatin, each recipe creator may have very specific reasons for using more or less water in the mix.

That said, here is the information I’ve found for you about making an agar agar egg!

METHOD #1:

Dissolve 1 teaspoon (approximately 4 grams) of agar-agar powder in 1 tablespoon of water to replace one egg.
To dissolve, first sprinkle the powder over the liquid, allow to rest for 5 minutes and then warm to 90 C over medium heat on the stove top.
Using a whisk, whip the agar mixture well to help dissolve, then refrigerate for 15 minutes and whip again. Add the agar to the baking mixture as the last ingredient and mix to just combine, do not overwork the mixture.

METHOD #2:

Use 1 tablespoon (9 grams) of agar-agar powder mixed with 1 tablespoon (15 grams) of water to replace one egg.
NOTE: If you have agar-agar flakes, be sure to grind them into a fine powder first as this will make a difference.

Vinegar & Baking Soda

I haven’t seen this one used all that much in AIP baking, but have heard of some using it successfully.

When mixed together, vinegar and baking soda start a chemical reaction that produces carbon dioxide and water, which makes baked goods light and airy, making this an especially good option for cakes and cupcakes.

Mixing 1 teaspoon (7 grams) of baking soda with 1 tablespoon (15 grams) of apple cider vinegar can replace one egg in most recipes.

Arrowroot Powder

I’ll admit to never having heard of this used as a specific egg replacement, but it very likely is that our AIP recipes employe these ingredients without us even realizing it!  I can’t say this would be my go-to of choices by any means if I were simply trying to substitute an egg in any recipe. 

A mixture of 2 tablespoons (about 18 grams) of arrowroot powder and 3 tablespoons (45 grams) of water can be used to replace one egg.

Carbonated Water

Carbonated water will obviously add moisture to a recipe, but it also acts as a leavening agent since the carbonation traps air bubbles, which help make the finished product light and fluffy.

You can replace each egg with one-fourth cup (60 grams) of carbonated water and the substitution is said to works well for cakes, cupcakes and quick breads. Again – I suggest sticking to AIP expert tested/created recipes rather than trying to reinvent the wheel.

Flax & Chia Eggs

While these are a wonderful Paleo option in baking going forward, if you’re on the AIP and still in the elimination stage, this option simply isn’t suitable for you.

BUT, if you’ve reintroduced these, here’s how to make them:

To replace one egg, whisk together 1 tablespoon (7 grams) of ground chia or flaxseeds with 3 tablespoons (45 grams) of water until fully absorbed and thickened.

Doing so may cause baked goods to become heavy and dense. Also, it may result in a nuttier flavor, so it works best in products like pancakes, waffles, muffins, breads and cookies.

Resource: Healthline – Effective Substitutes for Eggs


This post contains affiliate links.  Click here to see what that means.

AIP Carrot Cake with Lemon Cream Frosting by Ashley Clark AIP Recipe Collection Group

This recipe for AIP Carrot Cake with Lemon Cream Frosting comes to you from one of our very talented members in the AIP Recipe Collection Facebook Group. She’s generously offered to share her beautiful recipe with us here so the whole AIP community can enjoy it! 

There’s no reason for you do feel deprived at the holidays, on your birthday, anniversary or any other celebration … AIP can be very delicious and beautiful too!

♥ Thank-You Ashley ♥


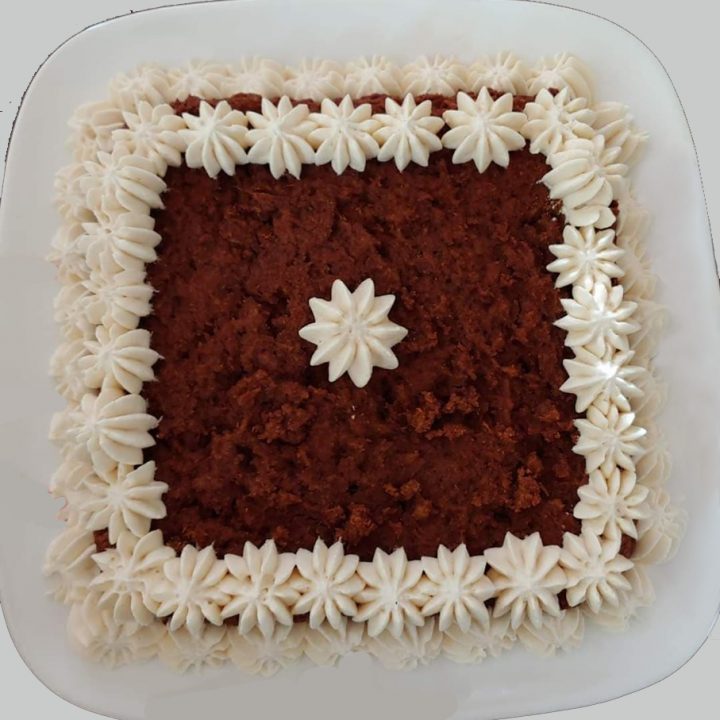
As you can see, this one’s pretty versatile … she’s created a playful cake for her AIP kiddo with a double batch of icing and a more elegant version for her hubby using a single batch of icing and simple piped stars … beautiful work!

You’ll notice that this cake calls for palm shortening … yes, I hear you … but what about the orangutan habitat!?  We’re all sensitive to things like this, so simply be sure to use a product that’s sustainably sourced. I personally use Nutiva brand because they’re serious about sustainability – read more about palm oil & palm shortening here in my post – What About Palm Oil?

Shop AIP - shopping for your autoimmune lifestyle - Fully Healthy Discount - AIP Recipe Collection

AIP Carrot Cake with Lemon Cream Frosting by Ashley Clark AIP Recipe Collection Group

AIP Carrot Cake with Lemon Cream Frosting

Yield: 14 to 16 - 2" Square Pieces
Prep Time: 30 minutes
Cook Time: 35 minutes
Total Time: 1 hour 5 minutes

♥ RECIPE & IMAGES BY: AIP Recipe Collection Group Member Ashley Clark ♥ No need to miss out at party time just because you're on the AIP! This cake is perfect for birthdays, anniversaries and any delicious celebration.

Instructions

  1. Preheat oven to 350 degrees
  2. Grease an 8x8 pan with avocado oil or other compliant fat
  3. Put tigernut flour in a coffee/spice grinder and grind until fine
  4. Add all dry ingredients (excluding Agar Agar) to a large mixing bowl
  5. Fold the carrots into the dry ingredients
  6. Mix wet ingredients (excluding the water listed with the Agar Agar) together in a medium bowl and set aside
  7. In a small sauce pan, heat the 8 Tbsp of water and Agar Agar over high heat, whisking continually until thickened. The mixture should be bubbling the entire time. Once thickened pour immediately into the wet ingredients and mix thoroughly
  8. Pour wet ingredients into the dry and mix just until combined (do not over mix)
  9. Pour into prepared pan and spread evenly
  10. Bake for 18 minutes and then cover the pan with aluminum foil and continue baking for an additional 16 minutes. Toothpick inserted in the centre should come out clean when cooked
  11. Allow to cool in the pan
  12. Invert to cooling rack and cool completely before frosting


Instructions for Icing:

NOTE: The icing ingredients listed above will make enough to ice one cake. If you want to pipe decorations on the cake, make an extra batch of icing for that purpose or simple pipe decorations on the bare cake - that looks pretty too.

Using a hand mixer, combine all icing ingredients together in a medium bowl and immediately ice the completely cooled cake.

Serve immediately or refrigerate.

Refrigerate left overs.

Agar Agar Substitution:

If you do not have agar agar you can use gelatin instead - HOWEVER, the ratios are different from what I've read (contrary to early learnings about this).

This recipe is basically calling for 2 eggs OR 2 Agar Agar eggs OR 2 gelatin eggs - so, you do you! Choose the one that's right for your stage of the AIP / diet!

How to Make A Gelatin Egg!

I have a lot of folks ask about this because they've had issues with making them. The method I always use is a success and is as follows...

1 Tbsp Gelatin
1/4 Cup Water

Add water to a small pot and sprinkle the gelatin over top.
Allow to sit for 2-3 minutes until the mixture hardens somewhat.
Place the post on a burner set to low heat for 1-2 minutes until the gelatin starts to melt. Be careful not to burn it! I usually stand by and start immediately whisking it.
Remove the pot from the heat and vigorously whisk until the mixture becomes frothy.

FOR THIS RECIPE - use 2 Tbsp Gelatin and 1/2 Cup Water to = 2 Gelatin Eggs

This post contains affiliate links.  Click here to see what that means.

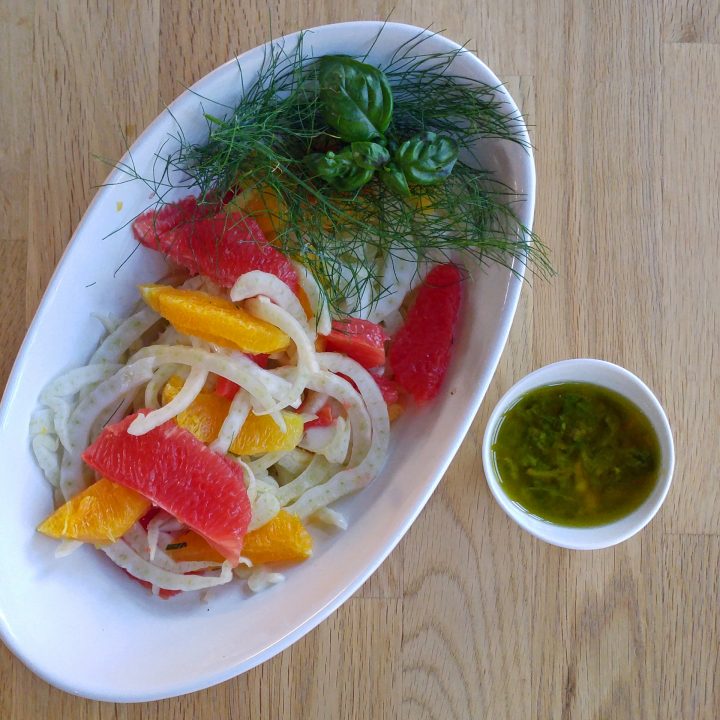
Looking for an easy accompaniment to go with your Grilled Orange Ginger Pork Tenderloin? Or craving something different for a simply flavorful AIP breakfast or lunch? It doesn’t get much easier than this Fennel Citrus Salad with Honey Lime Dressing!

The dressing for this salad pairs perfectly as a drizzle with our Grilled Orange Ginger Pork Tenderloin, saving you the trouble of making any additional sauces or glazes! As a stand-alone salad, these flavors are bright and refreshing and this salad lends itself well to being topped with left over chicken, salmon or even canned tuna or sardines for a nutrient packed meal.

The Inspiration 

This recipe is part of  our AIP Recipe Collection summer grilling project where we’re bringing you some tasty truLOCAL-inspired recipes.

Be sure to check out the main dish we suggestion pair this recipe with – Grilled Orange Ginger Pork Tenderloin

Enjoy! ♥

Shop AIP - shopping for your autoimmune lifestyle - Fully Healthy Discount - AIP Recipe Collection

Fennel Citrus Salad with Honey Lime Dressing

Fennel Citrus Salad with Honey Lime Dressing

Yield: 4 Servings
Prep Time: 10 minutes
Total Time: 10 minutes

♥ RECIPE & IMAGE BY: AIPRecipeCollection.com ♥ An easy accompaniment for any grilled meal and a perfectly simple stand alone salad easily adapted for breakfast or lunch.

Ingredients

  • 1 Fennel Bulb
  • 1 Medium Orange
  • 1/2 Pink Grapefruit

Honey Lime Dressing

Instructions

  1. PREPARE THE DRESSING: Measure all dressing ingredients into a small glass jar, affix the lid and shake well. Refrigerate and allow flavors to meld.
  2. PREPARE THE FRUIT & VEG: Remove the core from your fennel bulb and discard. If your fennel has fronds, reserve them for garnish. Thinly slice the fennel with a knife or a mandolin slicer (my recommendation here) and set aside in a bowl.
  3. Peel and slice the orange and grapefruit and set aside in a separate bowl.
    TIP:  Learn the easy way to peel and slice citrus and avoid struggling to get rid of the pith - check out this video!
    TIP: If you're prepping your salad in advance of serving, we suggest keeping the citrus and fennel separate until serving because the citrus will release some of it's juices and make the dish too runny.
  4. Just prior to serving, toss the fennel and citrus together in a serving bowl and top with chopped fennel fronds if you have them.
  5. Serve the Honey Lime Dressing on the side so your family can dress their salad themselves, and use a little as a drizzle for their Grilled Orange Ginger Pork Tenderloin that we have suggested pairing this salad with.

This post contains affiliate links.  Click here to see what that means.

Welcome to the fifth installment of our truLOCAL sponsored AIP Recipe Collection Grill Series! Our goal is to bring you some drool worthy AIP grill recipes that EVERYONE will enjoy – no need to cook separate meals when you’re serving up this kind of deliciousness! 

This fast and easy AIP dinner is super simple but completely worthy of Sunday Supper status!

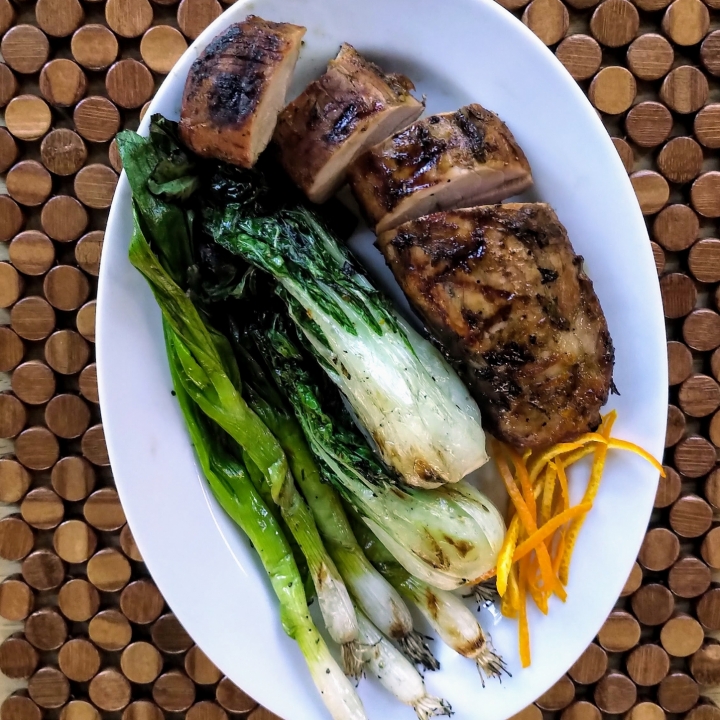
Everyone will enjoy this Asian-inspired Grilled Orange Ginger Pork Tenderloin served with simple AIP Grilled Vegetables (we suggest using Baby Bok Choi and Green Onions or Leeks) and a side of Fennel Citrus Salad with Honey Lime Dressing. TIP: Don’t skip this salad – it’s SO easy and delicious and the dressing pairs perfectly with the pork.

Plan ahead and marinade the tenderloin for a full 24 hours for maximum flavor infusion.

About truLOCAL

truLOCAL is a fully flexible meat delivery/subscription service that connects you with top-quality, LOCALLY sourced meat and fish!

It’s a simple meat delivery service with customizable plans that are commitment-free, so you can skip, pause, or cancel at any time – no strings attached! Shop for clean, locally sourced meat products online and make fewer trips to the grocery store or specialty shops.
 
truLOCAL is available in Canada, and yes, it’s TRULY LOCALLY Sourced Meat! That means you’re supporting YOUR local farmers! 
  • EAT BETTER
  • SAVE TIME
  • SHOP LOCAL
  • ALWAYS FLEXIBLE ALWAYS FREE DELIVERY! 

But wait, there’s more!

Special OffertruLOCAL Coupon Code AIPRecipeCollection.com

I’m thrilled that our partners at truLOCAL have agreed to offer my followers their CHOICE of amazing offers!
Get 10% OFF -or- FREE Boneless Skinless Chicken Breasts in their first TWO orders!

Shop with our affiliate link here and use coupon code AIPRECIPES10 for 10% off – or – coupon code AIPRECIPES at checkout and you’ll receive 6 or 4 FREE Boneless, Skinless Chicken Breasts in your first TWO boxes! (In Regular Size Box Orders – 6 / In Small Size Box Orders – 4. Please be sure to shop with BOTH the affiliate link AND the Coupon Code in order for your FREE Chicken Breast offer to be credited correctly.)

The Recipe

This easy AIP dinner is super simple and completely worthy of Sunday Supper … don’t skip the marinade time … the longer the more flavorful, and totally worth it!

If you’re looking for even more truLOCAL inspired recipes, be sure to check out the rest of the recipes in our AIP Recipe Collection Grill Series! ♥

Shop AIP - shopping for your autoimmune lifestyle - Fully Healthy Discount - AIP Recipe Collection

Grilled Orange Ginger Pork Tenderloin

Grilled Orange Ginger Pork Tenderloin

Yield: 4 Servings
Prep Time: 5 minutes
Cook Time: 15 minutes
Additional Time: 40 minutes
Total Time: 1 hour

♥ RECIPE & IMAGE BY: AIPRecipeCollection.com ♥ This Asian-inspired meal is fast, easy and AIP elimination stage compliant. Easy grilled veggies and our Fennel Citrus Salad on the side make it worthy of Sunday supper.

Ingredients

Marinade

Instructions

  1. Thaw your truLOCAL pork tenderloin in the refrigerator overnight or
    defrost in its packaging in cold water.
  2. Mix all marinade ingredients together in a shallow glass dish. Arrange tenderloin in a single layer and turn to coat. Cover and refrigerate for one hour, or up to 24 hours. For most flavorful results, turn the tenderloin halfway through the marinating time.
  3. Bring pork to room temperature approximately 15 minutes before grilling, this will help ensure your meat cooks more evenly.
  4. While the pork is coming to room temperature, prepare this easy Fennel Citrus Salad - click here for the recipe.
  5. Preheat and outdoor grill to high heat.
  6. Remove pork tenderloin from marinade and place on pre-heated
    grill. Season with salt and pepper. Grill over high heat until browned on all sides.
  7. Reduce grill to medium heat, cover and continue grilling, turning and moving until pork reaches internal temperature of 145 F. (Approximate cooking time will be about 15 minutes. Depending on your grill, you may need to reduce the flame and/or cook over indirect heat to ensure the pork is evenly cooked and does not burn.)
  8. Once pork reaches desired internal temperature, remove to plate,
    tent with foil and allow to rest 5 to 10 minutes before slicing and serving. This allows the juices to settle back into the meat.
  9. While the meat rests, grill your choice of vegetables as a side - we suggest Baby Bok Choi and Green Onions or Leeks - follow this easy recipe for AIP Grilled Vegetables.
  10. Drizzle pork with the Honey Lime Dressing from the Fennel Salad.

This post contains affiliate links.  Click here to see what that means. 

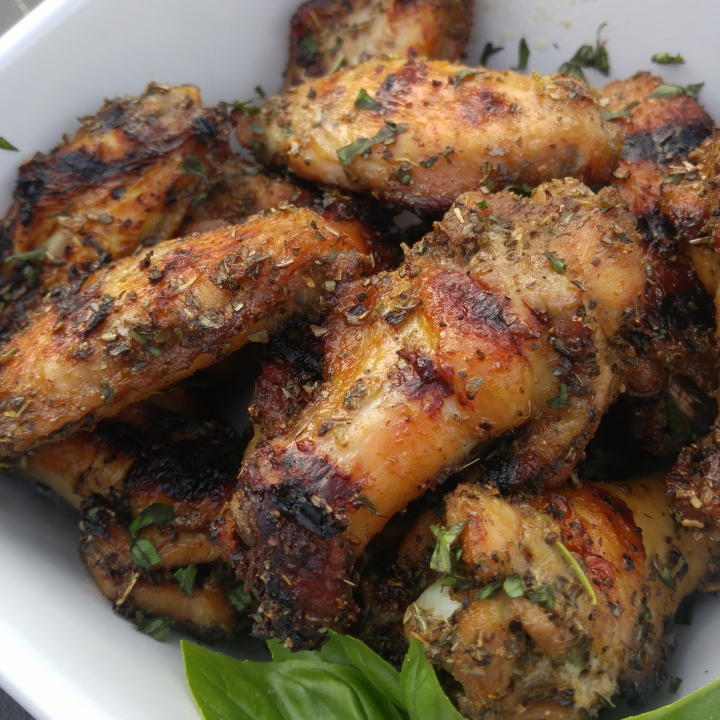
Before I started the AIP I used to love a big ‘ol feed of hot wings. Now, I still love wing night, but without the hot sauce. Now, my tastes have changed and crispy wings are my thing! I’m not saying I don’t miss a good sauce, but overall I’m too lazy to make my own, so I created these quick and delicious AIP BBQ chicken wings without the BBQ Sauce!

My goal was to create a simple recipe that doesn’t require much time in the kitchen or pre-planning for marinating (which most wing recipes call for if they’re not slathering them in sauce), and I think I pulled it off! I made sure my non-AIP hubby had some BBQ sauce on hand just in case he wasn’t thrilled with my creation, but he was more than happy with them sans-sauce. I call that an AIP winner!

About truLOCAL

truLOCAL is a fully flexible meat delivery/subscription service that connects you with top-quality, LOCALLY sourced meat and fish!

It’s a simple meat delivery service with customizable plans that are commitment-free, so you can skip, pause, or cancel at any time – no strings attached! Shop for clean, locally sourced meat products online and make fewer trips to the grocery store or specialty shops.
 
truLOCAL is available in Canada, and yes, it’s TRULY LOCALLY Sourced Meat! That means you’re supporting YOUR local farmers! 
  • EAT BETTER
  • SAVE TIME
  • SHOP LOCAL
  • ALWAYS FLEXIBLE ALWAYS FREE DELIVERY! 

But wait, there’s more!

Special OffertruLOCAL Coupon Code AIPRecipeCollection.com

I’m thrilled that our partners at truLOCAL have agreed to offer my followers their CHOICE of amazing offers!
Get 10% OFF -or- FREE Boneless Skinless Chicken Breasts in their first TWO orders!

Shop with our affiliate link here and use coupon code AIPRECIPES10 for 10% off – or – coupon code AIPRECIPES at checkout and you’ll receive 6 or 4 FREE Boneless, Skinless Chicken Breasts in your first TWO boxes! (In Regular Size Box Orders – 6 / In Small Size Box Orders – 4. Please be sure to shop with BOTH the affiliate link AND the Coupon Code in order for your FREE Chicken Breast offer to be credited correctly.)

The Recipe

This simple recipe uses common ingredients you probably already have on hand, and there’s little active prep and cook time on this one so you can put your feet up and relax while you soak up some vitamin D! 

Hope you enjoy! ♥

If you’re looking for more truLOCAL inspired recipes, be sure to check out my AIP Recipe Collection Grill Series!

Shop AIP - shopping for your autoimmune lifestyle - Fully Healthy Discount - AIP Recipe Collection


AIP BBQ Chicken Wings

AIP BBQ Chicken Wings

Yield: 2 Servings
Prep Time: 5 minutes
Cook Time: 20 minutes
Total Time: 25 minutes

♥ RECIPE & IMAGE BY: AIPRecipeCollection.com ♥ Looking for a quick and delicious appetizer or main that won't heat up your kitchen? Fire up your grill and try my delicious AIP BBQ Chicken Wings that don't require a sauce!

Ingredients

Instructions

  1. Thaw your truLOCAL chicken wings in the refrigerator overnight or defrost in their packaging in cold water.
  2. Add all of the ingredients to a large bowl. Using your hands, massage the herbs and spices into the wings so they are all well coated.
  3. Preheat grill to medium-high heat
  4. Lower the flame to the lowest setting possible in one zone of your BBQ - leave the other zone set to medium-high.
  5. Place the wings in the cooler zone of the grill and cook with the lid closed. Flip the wings every 5 minutes, for a total cooking time of approximately 20 minutes - they should be golden brown, crispy and completely cooked through. As they cook, keep a close eye on the grill - if there are flare-ups or the wings begin to burn, move the wings to a cooler part of the grill or reduce the heat.
  6. Serve immediately.

Notes

Tips & Serving Suggestions :

  • You could use this recipe with chicken legs or thighs but you'll need to adjust your cooking times and ensure an internal temperature of 165F is reached.
  • Prefer your wings saucy? Join our searchable Facebook Group for inspiration and try searching BBQ Sauce, Ranch Dressing, Chimichurri Sauce, Honey Garlic, Orange Ginger or what ever might suit your fancy!
  • Serve with a big healthy green salad, coleslaw, AIP "potato" salad or lots of AIP compliant veggies and dips! Try our searchable Facebook Group for lots of recipe ideas.

This post contains affiliate links.  Click here to see what that means.

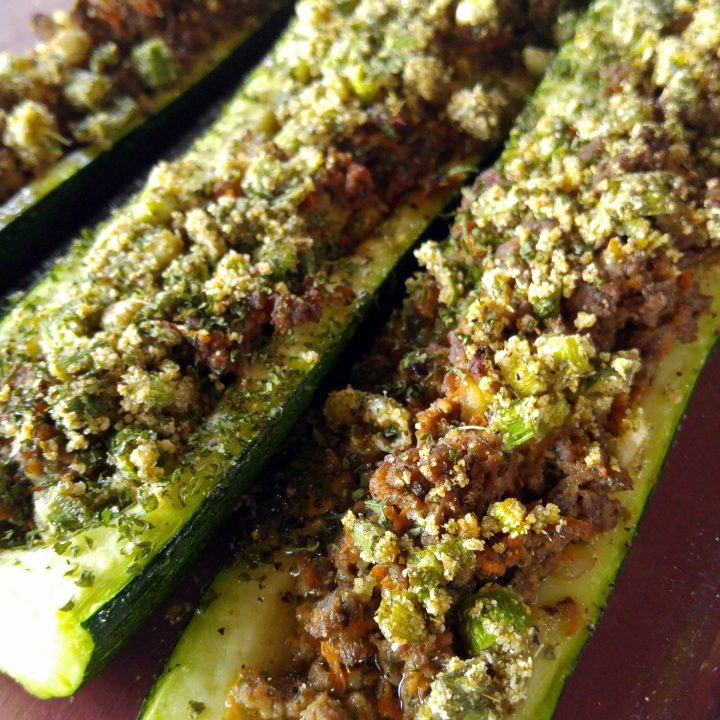
If your garden’s producing so many zucchini you can barely keep up, try this simple yet flavorful recipe for AIP Zucchini Boats with a crispy topping. It’s a fast and easy beginner recipe that will help use up a bunch of zucchini in short order.

Be sure to check the notes at the bottom of the recipe for some extra suggestions to spice things up AIP-style or for your non-AIP family! I love recipes you can easily adapt to keep the whole family happy.

Hope you enjoy! ♥

Fully Healthy Formerly Shop AIP - AIP Discount ShoppingSpecial Offer

Looking for the Grain-Free Paleo Powder Seasoned Coating Mix I use in this recipe? You can find it and so much more my affiliate shop, Shop AIP! 

If you’ve never heard of Shop AIP, you’re going to LOVE this! Shop AIP is the BEST shop for AIPers – products are clearly labelled for each stage of the AIP, from elimination through reintroductions … such a relief not to have to read every label!

Shop with my affiliate link here and use coupon code AIPRecipe at checkout and you’ll receive 10% Off your entire first order!


AIP Zucchini Boats

AIP Zucchini Boats

Yield: 4 Servings
Prep Time: 10 minutes
Cook Time: 25 minutes
Total Time: 35 minutes

♥ RECIPE & IMAGE BY: AIPRecipeCollection.com ♥ A simple, flavorful recipe you can easily adapt to keep even the fussiest eaters happy.

Ingredients

Filling

Topping

Instructions

  1. Wash zucchini and trim ends off. Slice in half length-wise and scoop out the insides to create a boat/cavity deep enough to allow space for your meat mixture. Reserve the zucchini you scoop out.
  2. Place zucchini boats in a Pyrex baking dish or casserole dish and brush lightly with olive oil. Sprinkle with pinch of Himalayan salt and black pepper if you've reintroduced.
  3. Mix ground beef, chopped reserved zucchini, shredded carrot and the dry seasonings. Use your hands to ensure everything is well blended.
  4. In a large skillet, heat 1 Tbsp olive oil and sautee onion until translucent. Add minced garlic and sautee until fragrant.
  5. Preheat oven to 400 F.
  6. Add ground beef mixture and sautee until browned. If there is a lot of fat, you can drain it off, I didn't find the need.
  7. While the filling cooks, mix all topping ingredients together in a small bowl, ensuring there are no clumps and set aside.
  8. If you're cooking for non-AIPers or want to add more flavor, see the tips below for some additional, optional suggestions.
  9. Spoon filling mixture into zucchini boats and add the topping mixture. Sprinkle with extra dried parsley if you wish, and a pinch or two of black pepper if you've reintroduced.
  10. Bake at 400 F for 25 minutes or until zucchini are tender but still al dente in texture. You can opt to broil for a few minutes to ensure the topping is browned and crispy.
  11. Serve immediately.

Notes

TIPS!

  • This recipe is VERY adaptable! You can add extra flavor by topping it with cooked and crumbled AIP compliant bacon. Or, try mixing some fauxmato sauce or AIP BBQ sauce in to the filling mixture before adding it to your zucchinis boats (about 1/2 a cup should be enough to half of the ground beef mixture). Add some extra veggies, like chopped mushrooms if you wish. Looking to add some cheesy flavor? Try a sprinkle of Non-Fortified Nutritional Yeast.
  • Serving to non-AIPers and want to liven this dish up a bit more for them? Divide your filling mixture and add their favorite pre-made tomato sauce and maybe some hot pepper flakes before adding to their zucchinis boats. You can top theirs with grated mozzarella or Parmesan if they're into that.

This post contains affiliate links.  Click here to see what that means.

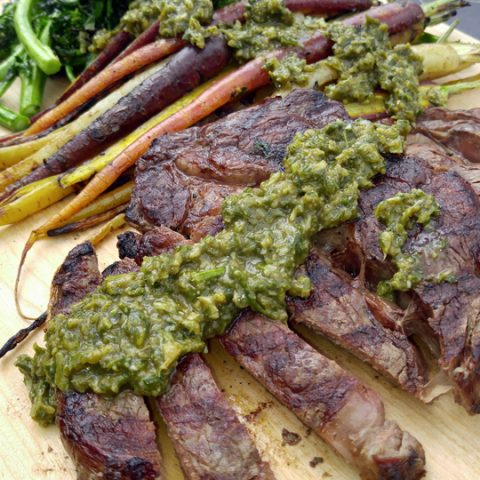
Ribeye, Rapini and Rainbow Carrots … Oh my!

Don’t worry, you don’t have to be a grill-master or a whiz in the kitchen to pull off this delectable, steak-house quality dinner. And, since you’re whipping up this simple recipe at home, indulging in this steak dinner is far more economical than date-night out!

TIP:  Sign up for a flexible truLOCAL meat subscription with the offer below and you’ll receive some bonuses that make this one even more affordable!

Cut & Quality Count!

Choosing the right cut of quality, grass-fed beef is key. Did you know that grass-fed beef is not only higher in omega-3s, but it’s also better tasting too? You really can’t beat the flavor of a tender, juicy and well-marbled truLOCAL ribeye steak – the marbling enhances the flavor while basting the meat in the cooking process to ensure a juicy steak.

When it comes to cooking a ribeye, you don’t need to worry about marinades and sauces, simple seasoning is best, and grilling is fast and easy. Add a couple of flavorful, nutrient dense accompaniments and you’ll look like a pro!

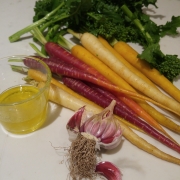
Why Rapini and Rainbow Carrots?Rainbow Carrots and Rapini, Garlic

Rapini (or Broccoli Rabe/Broccolini) is a nutty, bitter and pungent vegetable. Bitter vegetables like rapini improve digestion, so it’s a great vegetable to pair with beef (learn more about Rapini health benefits here). But, since bitter might not be your thing, we add garlic, lemon and apple cider vinegar in our seasonings to help reduce it.

Rainbow carrots, really? Can’t I just use regular carrots? Sure, you can just use “ordinary” carrots if that’s all you can get, but since our goal is to get a variety of nutrients in us, try mixing things up when you have a chance.

Did you know: Each individual color of rainbow carrots contains a specific set of phytonutrients (antioxidants) which offer slightly different nutritional benefits. Eat the rainbow folks!

  • Orange carrots contain the highest concentrations of alpha- and beta-carotene. Alpha- and beta-carotene promote and support your body’s production of vitamin A, which is a necessary vitamin for healthy eyes.
  • Red carrots are rich in lycopene (as are tomatoes – it’s the phytonutrient that gives red fruits and veggies color) and beta-carotene. Lycopene has been shown in some studies to reduce the risk of heart disease and some types of cancer, including prostate and cervical cancer.
  • Yellow carrots contain the phytonutrient lutein, which is linked to the reduced risk of certain age-related eye diseases, including macular degeneration and cataracts.
  • Purple carrots are high in anthocyanins, as well as alpha- and beta-carotene. Anthocyanins have been shown to have anti-inflammatory properties, help protect against heart-related diseases, and support a healthy immune system.

About truLOCAL

truLOCAL is a fully flexible meat delivery/subscription service that connects you with top-quality, LOCALLY sourced meat and fish!

It’s a simple meat delivery service with customizable plans that are commitment-free, so you can skip, pause, or cancel at any time – no strings attached! Shop for clean, locally sourced meat products online and make fewer trips to the grocery store or specialty shops.
 
truLOCAL is available in Canada, and yes, it’s TRULY LOCALLY Sourced Meat! That means you’re supporting YOUR local farmers! 
  • EAT BETTER
  • SAVE TIME
  • SHOP LOCAL
  • ALWAYS FLEXIBLE ALWAYS FREE DELIVERY! 

But wait, there’s more!

Special OffertruLOCAL Coupon Code AIPRecipeCollection.com

I’m thrilled that our partners at truLOCAL have agreed to offer my followers their CHOICE of amazing offers!
Get 10% OFF -or- FREE Boneless Skinless Chicken Breasts in their first TWO orders!

Shop with our affiliate link here and use coupon code AIPRECIPES10 for 10% off – or – coupon code AIPRECIPES at checkout and you’ll receive 6 or 4 FREE Boneless, Skinless Chicken Breasts in your first TWO boxes! (In Regular Size Box Orders – 6 / In Small Size Box Orders – 4. Please be sure to shop with BOTH the affiliate link AND the Coupon Code in order for your FREE Chicken Breast offer to be credited correctly.)

The Recipe

This recipe is overall about as simple as they come. Very little prep time is required, and you make the chimichurri sauce the day before which means your actual meal-time prep is minimal – perfect for a special occasion or date night with your sweetheart. 

I hope you’ll try my suggested sides – they’re so easy, and pairing steak with a bitter vegetable helps with digestion. It’s also easy to add a different side dish (like potatoes) if you have non-AIP family that you’re dining with, though my non-AIP hubby enjoyed this without his standard sides.

If you’re looking for more truLOCAL inspired recipes, be sure to check out my AIP Recipe Collection Grill Series! ♥

Shop AIP - shopping for your autoimmune lifestyle - Fully Healthy Discount - AIP Recipe Collection

Grilled Ribeye, Rapini, Rainbow Carrots and Chimmichuri

Grilled Ribeye, Rapini & Rainbow Carrots with Garlic Scape Basil Chimichurri

Yield: 2 Servings
Prep Time: 15 minutes
Cook Time: 10 minutes
Additional Time: 5 minutes
Total Time: 30 minutes

♥ RECIPE & IMAGE BY: AIPRecipeCollection.com ♥ A delectable, steak-house quality dinner that's easy enough for the newest of cooks!

Ingredients

Garlic Scape Chimichurri

Grilled Rapini & Rainbow Carrots

Instructions

For best flavor, prepare your Chimichurri sauce a day in advance.

When it's time to grill, everything can be cooked at the same time, which makes this a fast and easy meal.

Garlic Scape Chimichurri :

  1. Add all chimichurri ingredients to a food processor and blend until smooth.
  2. Depending on the desired thickness of your chimichurri sauce, you may wish to add some additional olive oil.
  3. Store in a glass jar over night in the refrigerator.

Prepping Steaks & Veggies :

  1. Thaw your truLOCAL ribeye steaks in the refrigerator overnight or defrost in their packaging in cold water. Remove Chimmichuri sauce and steaks from refrigerator at least 30 minutes before cooking, but no more than 1 hour, this will help ensure your meat cooks more evenly.
  2. Season both sides of the steak with a pinch or two of Himalayan salt and pepper if you've reintroduced - for ribeye steaks, the simpler the seasoning the better.
  3. In a small dish combine extra virgin olive oil and crushed garlic and set aside to allow flavors to meld.
  4. Thoroughly wash and trim rapini, allowing it to soak while you scrub the rainbow carrots (no need to peel) and trim the tops off.
  5. Pat the rainbow carrots dry and cut in half lengthwise. Brush with garlic olive oil and set aside.
  6. Rinse the rapini and lightly dry with a clean kitchen towel. Place rapini in a large bowl and drizzle with remaining garlic olive oil and 1 Tbsp. of Chimmichuri sauce. Using your hands, massage the oil and Chimmichuri into the rapini.
  7. Pre-heat your grill to medium-high heat.
  8. Arrange rapini and carrots on the grill in a single layer and season with a pinch or two of Himalayan salt.
  9. Place ribeye steaks on the grill. Cook over direct heat for 4-5 minutes on each side for medium-rare (see temperature tips below). Reduce flame or move to cooler spots on your grill to avoid burning or flareups. 
  10. Flip and turn vegetables, moving them around the grill to avoid burning - some charring is good, but avoid burning.  
  11. Remove steak from grill and allow to rest, tented with foil, for a 5-10 minutes prior to serving. This allows the juices to settle back into the meat.
  12. Vegetables should be cooked at approximately the same time as your steak, but check to ensure they're cooked through but still al dente. Remove to a bowl or serving platter and cover to keep warm while the steak rests.
  13. Plate steak and vegetables and drizzle with Chimichurri Sauce.

Notes

Temperature Tips!

Use an instant meat / grilling thermometer to determine if your steaks are cooked the way you like them.

120° F = Rare
130° F = Medium rare
140° F = Medium
160° F = Well done