Mom’s Dill Pickles

This post contains affiliate links. Click here to see what that means.
There’s something deeply satisfying about preserving your own food, and pickling cucumbers is a wonderfully simple way to capture the essence of summer in a jar. For me, this recipe isn’t just about the delicious, crisp pickles it produces; it’s about the cherished memories of making them with my mom.
I’m excited to share her recipe and this trip down memory lane with you.😊
I can remember the smell of the kitchen every summer as my mom feverishly worked to preserve the bounty of the garden and the orchards that we lived near – these are some of my most treasured memories.
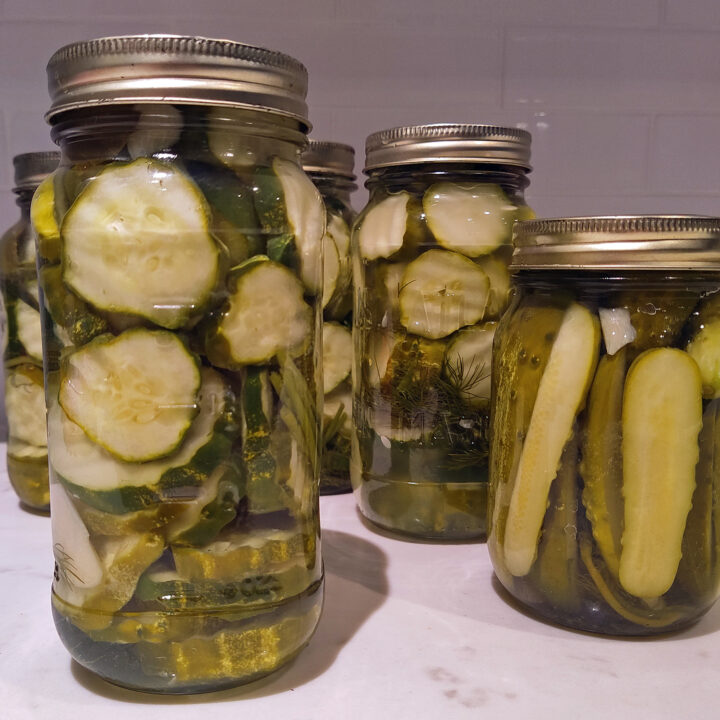
The aroma of fresh dill and garlic meant it was time for one of my favorites … Mom’s Dill Pickles! As a kid, I was always so proud to be entrusted with packing the little cucumbers into the tightest spaces in the jars, so no space was wasted.
This recipe for “Mom’s Dill Pickles” is a beautiful blend of tradition and love, passed down through generations, and now adapted to fit my dietary restrictions … because, finding AIP core elimination stage compliant pickles on the market is just about as difficult as the rhyme about Peter Piper picking a peck of pickled peppers!! … So it was back to the kitchen for me!
Get ready to create crunchy, tangy pickles that’ll make your taste buds dance. Not only are they a fantastic snack, but they also make awesome gifts. Grab those cucumbers, and let’s get pickling!
Before we begin – a word about the brine and quantities!
This recipe is for 9 cups of brine (my mom used to make 18 cups at a time). So, if you’re pickling a LOT of cucumbers or just a few, simply adjust the quantities to suit your needs. If you have left-over brine, you can store it in the refrigerator and re-heat it when your next batch of cuc’s are ready to be harvested.

Mom's Dill Pickles
♥ RECIPE & IMAGE BY: AIPRecipeCollection.com ♥ Discover the nostalgic joy of making tangy, crunchy dill pickles with our cherished family recipe, deliciously adapted to be AIP compliant.
Ingredients
- IMPORTANT: See Note above regarding quantities
- 9 Cups water
- 1/2 cup Pickling Salt
- 1/2 Cup Apple Cider Vinegar
For the Jars:
- Small Pickling Cucumbers
- Fresh Dill Weed (one handful per jar)
- Whole Garlic Cloves (one per jar)
- Bay Leaves (one per jar)
- Crushed Red Pepper Flakes (optional - pinch per jar)
Instructions
Prepare the Brine:
- In a large pot, combine 9 cups of water, 1/2 cup of pickling salt, and 1/2 cup of apple cider vinegar.
- Bring the mixture to a simmer on the stove, stirring occasionally until the salt is fully dissolved.
- Once simmering, remove the brine from the heat and let it cool slightly so you don't burn yourself when it comes time to pour the brine in the jars.
Prepare the Jars & Pack the Cucumbers:
Use clean, sterilized canning jars (I like these wide-mouth mason jars) and their sealing rings.
To sterilize you can simply make sure your jars are washed and fill them with very hot tap water.
Note: Previously, seals were boiled in water, but modern sealing caps/rings usually do not require this. Follow the manufacturer's instructions for your sealing products.
To each jar, add:
- A handful of fresh dill weed.
- 1 peeled garlic clove (or more if you like them garlicky!)
- 1 whole dried bay leaf.
- A pinch of dried red pepper flakes (optional).
- Firmly pack the jars with small pickling cucumbers. It's best to use baby cucumbers, but you can slice larger cucumbers into quarters or slices if necessary. Avoid cutting them too thin, as sliced cucumbers can become mushy, depending on their size and seediness.
Brine & Seal:
- Pour the prepared (and still warm) pickling brine into each jar, covering the cucumbers completely. Ensure there's about 1/2 inch of headspace at the top of the jar.
- Wipe the rims of the jars with a clean cloth to remove any residue.
- Place the lids and screw on the sealing rings until just fingertip tight.
- Note: It's normal if the jars don't seal immediately.
Fermentation:
This is a simple recipe - no water bath required for long-term storage.
- Once capped, allow the jars to begin fermentation by keeping them on your counter for about a week. Monitor them in case they start to bubble and overflow; if they do, clean the jars' exteriors.
- After about a week, tighten the rings. Store any jars that haven't sealed (if the lids flex up and down when pressed) in the fridge and consume those first.
Store & Enjoy!
- Store the sealed jars in a cool, dark place (like a pantry or fruit cellar) for a few weeks to allow the flavors to develop fully.
- Once opened, keep the pickles in the refrigerator.